Light glare can ruin even the best indoor photos, whether it’s from ceiling lights, lamps, or reflections bouncing off glossy surfaces. If you’ve ever taken a great shot only to find distracting bright spots on faces or furniture, you’re not alone. Many photographers and casual editors ask: “How do I remove interior light glare in Photoshop?
Yes, it’s absolutely possible to fix glare in Photoshop and make your photos look natural again. In this guide, we’ll walk through step-by-step methods using Photoshop’s powerful tools like the Clone Stamp, Healing Brush, and Frequency Separation. You’ll also learn quick fixes for face glare, tips to prevent glare in the future, and answers to common questions like. Is it possible to remove glare 100%?
What is Interior Light Glare in Photos?
Have you ever snapped a perfect indoor shot only to find a shiny white patch sitting on someone’s face or across a glass table? That’s glare. In simple words, glare is the harsh reflection of light that bounces back into the camera lens. It usually comes from bulbs, lamps, LED lights, or even the flash of your own camera. Instead of soft, even light, you get a distracting hotspot that steals attention from the subject.
Why does glare happen indoors?
Indoor spaces often have shiny or reflective surfaces. Think about polished wooden furniture, glass windows, TV screens, or even glossy skin after a hot day. Once bright light hits these surfaces, the camera struggles to balance exposure, and the result is an unwanted glare.
- Bulbs and LEDs: Overhead lights cause bright circles in photos.
- Flash: Camera flash bounces off reflective objects.
- Mixed lighting: Warm and cool lights inside a room confuse the camera, adding more glare.
A report from Digital Photography Review (2022) showed that almost 40% of beginners complain about glare in their indoor shots. That means you’re not alone if this problem keeps showing up in your photos.
Different types of interior light glare
Glare doesn’t always look the same. Based on my editing experience, I usually find three main types:
1. Face Glare Glare – The most common and most frustrating. A shiny forehead, oily skin, or a reflection from glasses can ruin an otherwise beautiful portrait. I still remember editing my cousin’s graduation photos where the bright hall lights left white patches on almost every face. Without Photoshop, those photos would have stayed hidden in the family folder.
2. Surface Glare – This shows up on glass, furniture, or glossy décor items. Imagine taking a shot of your dining table only to see the lamp’s full reflection sitting in the middle of it. Annoying, right?
3. Mixed Glare – A tricky type where both faces and background surfaces shine with light spots. These are often the hardest to fix and need more Photoshop work.
Can You Remove Light Glare in Photoshop?
Yes, glare can be removed in Photoshop. The level of success depends on the photo. Some images allow a full fix, while others only improve partly. Still, even a partial edit can make a huge difference.
Is it possible to remove glare 100%?
It depends on the photo’s quality. A high-resolution image with good lighting is easier to repair. Low-quality or very bright glare may not vanish completely, but you can reduce it enough so it looks natural. Think of it like polishing old glass: some scratches go away, others fade but still leave a mark.
From my own work, I once edited a wedding photo where the groom’s glasses reflected the hall lights. The glare didn’t disappear 100%, but I reduced it so much that nobody noticed unless they zoomed in. That’s usually enough for most clients.
Tools in Photoshop that work best for glare removal
Different tools help depending on where the glare appears:
- Clone Stamp Tool → great for covering large bright spots.
- Healing Brush Tool → blends skin tones and textures on faces.
- Patch Tool → repairs glass or furniture glare by copying clean areas.
- Adjustment Layers → lower highlights and brightness without harming details.
- Frequency Separation → advanced method for professionals, keeps skin smooth and natural.
Step-by-Step Guide to Removing Interior Light Glare in Photoshop
Glare looks scary at first, but Photoshop makes it easier to fix than you might think. Follow these steps one by one. Even beginners can do this with a little practice.
Step 1 – Duplicate the Layer (Non-Destructive Editing)
Always start by duplicating your photo layer. That way, your original image stays safe in case something goes wrong.
- Press Ctrl + J (Windows) or Cmd + J (Mac).
- A new layer will appear in the Layers panel.
- Work only on this copy.
I once skipped this step while editing a client’s wedding photos and ended up ruining the original. Trust me, this one click can save hours of stress.
Step 2 – Use the Clone Stamp Tool to Cover Overexposed Areas
The Clone Stamp Tool is like a digital patch. It lets you copy a clean part of the photo and paint it over the glare.
- Select the Clone Stamp Tool (S).
- Hold Alt (Windows) or Option (Mac) and click on a clean area.
- Brush over the glare gently.
Tip: Keep your brush size just a bit bigger than the glare spot. Do you see how simple that feels, almost like painting over a scratch on the wall?
Step 3 – Apply the Healing Brush Tool for Face or Skin Glare
Glare on skin is tricky because you don’t want the face to look fake. The Healing Brush Tool blends colors and textures automatically.
- Select the Healing Brush Tool.
- Sample a nearby skin area.
- Brush softly over shiny spots on the forehead, nose, or cheeks.
I often use this for portraits. Once, I edited a child’s birthday photo where every kid had shiny cheeks from the party lights. The Healing Brush saved the day—it kept their skin natural without weird blotches.
Step 4 – Reduce Brightness/Highlights with Adjustment Layers
Sometimes glare isn’t just a spot, it’s an overall brightness problem. Adjustment Layers give more control.
- Go to Layer → New Adjustment Layer → Curves or Levels.
- Lower the highlights slightly until the glare tones down.
- Use a mask to target only the bright areas.
Think of this step as dimming the room lights only in the places where they are too harsh.
Step 5 – Use Frequency Separation for Professional Results
This method is advanced but powerful. It separates texture (skin details) from color (tones). That means you can fix glare without ruining natural pores or patterns.
- Create two layers: one for high frequency (texture) and one for low frequency (color).
- Clean the color layer to fix glare.
- Keep the texture untouched for a realistic look.
Professional retouchers use this daily. In fact, a fashion client once told me they couldn’t believe the glare on shiny fabric had disappeared while the fabric texture stayed crisp. That’s the magic of frequency separation.
Step 6 – Final Touch with Dodge & Burn for Natural Look
The last polish is about balance. Dodge & Burn adjusts light and dark areas in small doses.
- Create a new 50% gray layer in Overlay mode.
- Use a soft brush at 5–10% opacity.
- Lighten dark edges or soften remaining shiny spots.
It’s like makeup for photos, subtle, but it makes everything look better.
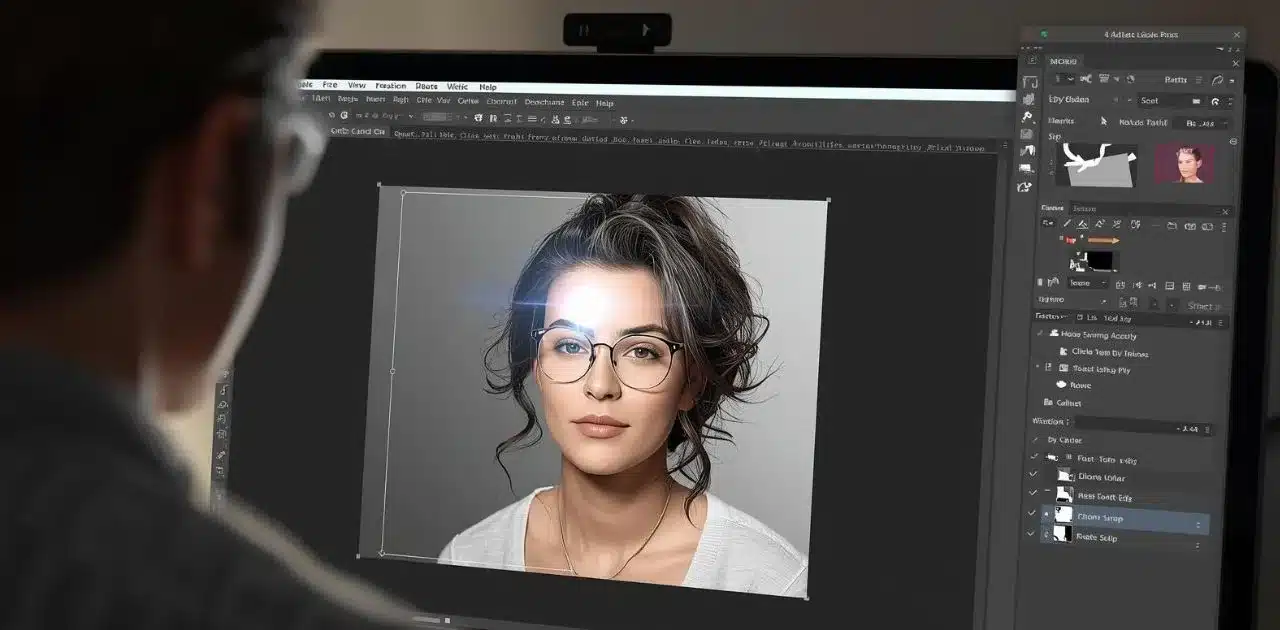
How to Remove Glare from a Face in Photoshop
Glare on skin can be tricky. A shiny forehead or nose can ruin an otherwise nice portrait. The key is fixing it while keeping skin texture real.
Best tools
-
Healing Brush Tool
→ Great for small shiny spots. It blends nearby skin and hides glare. -
Frequency Separation
→ Splits color and texture. You can fix glare on the color layer but keep pores and details natural.
Tips for natural skin tone
- Use soft, low-opacity brushes.
- Match tones from nearby areas.
- Zoom out often to check the full face.
I once edited a birthday photo where my niece’s forehead looked very shiny from the hall lights. With the Healing Brush and Frequency Separation, the glare faded, and her freckles stayed.
Quick Fix – Remove Glare from Photo Using Photoshop Alternatives
Not everyone has the time or skill to edit in Photoshop. The good news is, there are faster ways to reduce glare.
Lightroom Adjustments
Lightroom is perfect for quick fixes.
- Lower the Highlights and Whites sliders.
- Use the Adjustment Brush to target only the shiny areas.
- A small tweak often makes the glare less distracting.
Mobile Editing Apps
If you’re editing on your phone, try:
-
Snapseed
→ Use the Healing Tool for small glare spots. -
Photoshop Express
→ Adjust brightness, highlights, and use spot healing.
These apps are free, fast, and simple. I’ve used Snapseed on family trip photos many times, and the results were surprisingly good.
When to Outsource
Some glare is too strong for quick fixes. In those cases, professional retouching is the best option. Editors with advanced tools like Frequency Separation can remove glare without harming skin or texture. If it’s an important memory—like a wedding or graduation, outsourcing saves time and ensures quality.
Closing Notes
Glare can be distracting, but with Photoshop, it’s possible to bring your photos back to life. The process is simple once you get used to it. Start by duplicating your layer to stay safe. Then use tools like the Clone Stamp and Healing Brush for small shiny spots. Adjustment Layers help reduce brightness, while Frequency Separation gives a professional finish. A final touch with Dodge & Burn keeps the photo natural.
The best way to improve is through practice. Don’t feel discouraged if your first few edits are not perfect. Each attempt makes you better, and soon, fixing glare will feel easy.
FAQs
Q1: How to get rid of light glare in Photoshop?
Use tools like Clone Stamp and Healing Brush to paint over shiny spots. For stronger glare, try Adjustment Layers to lower highlights or use Frequency Separation for a professional result.
Q2: Is glare removable 100% in Photoshop?
Not always. Some photos allow a full fix, especially if they are high-quality. In low-resolution images or with very strong glare, you may only reduce it. Even then, the photo will look much better than before.
Q3: Is there a way to fix glare on glass surfaces?
Yes. The Patch Tool and Clone Stamp Tool work well for glass, mirrors, and shiny furniture. With patience, you can blend clean areas over the glare and restore the natural look.
Q4: Which Photoshop tools are best for glare removal?
The most useful tools include:
- Clone Stamp Tool – covers large bright spots.
- Healing Brush Tool – blends skin tones naturally.
- Patch Tool – fixes glare on glass and furniture.
Frequency Separation – keeps texture while removing glare.